*This post may have affiliate links, which means I may receive commissions if you choose to purchase through links I provide (at no extra cost to you). As an Amazon Associate I earn from qualifying purchases. Please read my disclaimer for additional details. Thank you for supporting the work I put into this site!
This tutorial is going to walk you through getting set up with a hosting account with A2 website hosting. The biggest benefit of using this host is that they allow you to purchase just one month’s hosting. If that is all you can truly afford to get you going on your blog RIGHT now…then this is how you get your blog hosting setup for under $10!
If you are looking to set up a completely free blog I give you some options in my post Blog Hosting for Beginners.
Step 1: Click On My Affiliate Link to Go To Their Website
This does give me a commission but it does not affect the price you pay for the services they provide. I recommend A2 because I have used them at work and we like them. The setup isn’t as easy as BlueHost but it is pretty close AND they offer 1 month payment up front instead of a minimum of 1 year.
Keep in mind this option, paying one month at a time instead of annually, does wind up being more expensive in the long run. Don’t worry. I won’t judge though. I’ve been in the situation where I just COULD NOT afford to pay for months worth of a product or service to get a discount. That’s OK. We don’t judge here. The good thing is you are getting started!
If you CAN afford to pay at least 1 year at a time…I recommend BlueHost. You can use this link for more info:

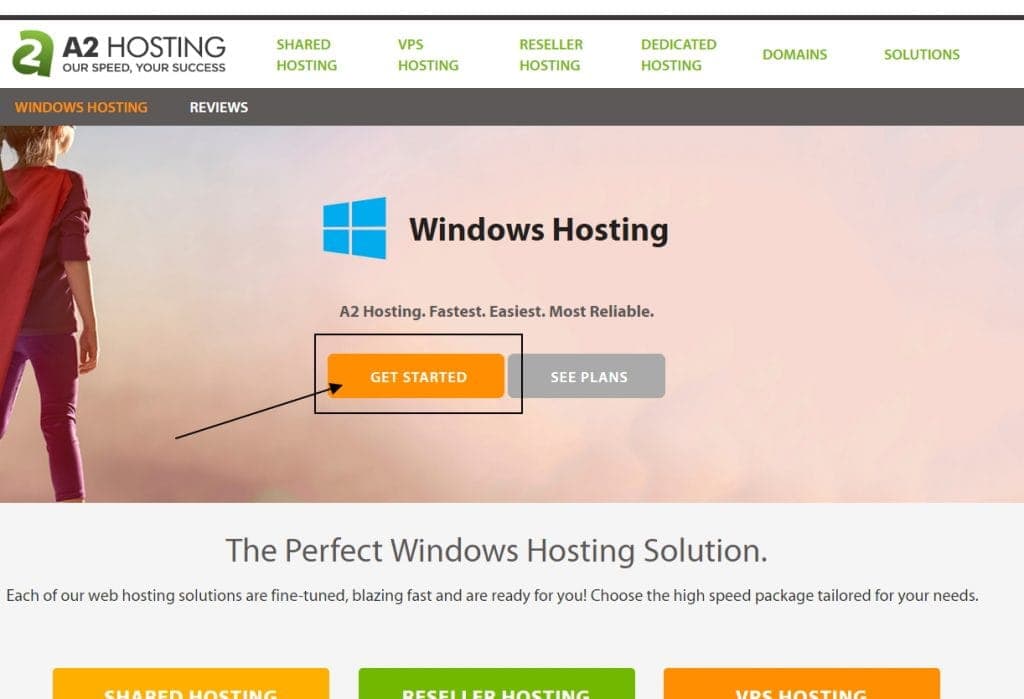
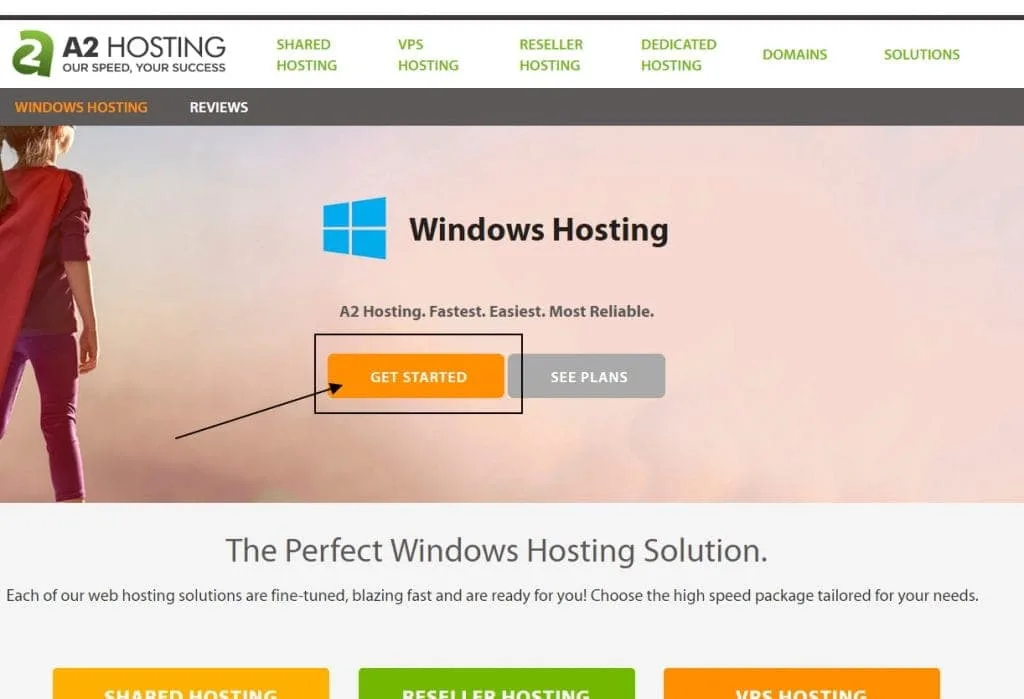
If you need to get started with just one month at a time, use A2. Once you are at the A2 website, click on the Get Started button. It should look something like this:
Step 2: Answer the Domain Name Question

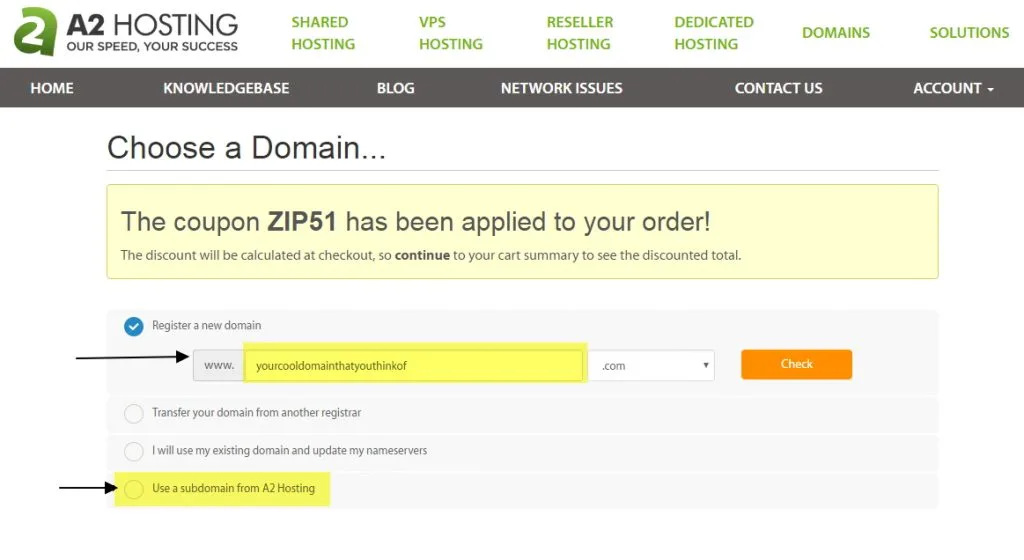
There are a few options for domain names, but really only two options so let me explain them in order:
You are Going to Register A New Domain
If you don’t have a domain name yet AND can afford to get one now, this is the option you want. I want to give you a few tips:
- You can probably get your domain cheaper elsewhere. The convenience of setting it up here is that it is one account to deal with instead of two and they are automatically connected. Don’t worry, I show you how to connect a domain if you register it somewhere else for cheaper so don’t feel obligated to purchase here if you don’t want to. This is really just for your convenience.
- If you don’t have an idea for a domain name, aren’t sure what you want to go with, or just having doubts about committing to a domain name now, don’t worry about it and skip to Option 4: Use A Subdomain from A2 Hosting. You can always add a domain name later. It is OK.
You Have A Domain Name Already and Will Want it to Work with A2 for Hosting
Maybe you registered at GoDaddy or NameCheap or 101Domains. That’s OK you can set it up to transfer in here. Start with Option 2: Transfer your domain from another registrar and follow the steps. I’m not going to go through the steps here but setting up a domain to direct to a new host is generally pretty easy.
If you have trouble with this step at all , just choose Option 3: I will use my existing domain and update my name serves. It’s OK. Your domain registrar and A2 will provide you with the support to get the two hooked together later.
I highlighted option 1 and option 4 because both will get you started very quickly.
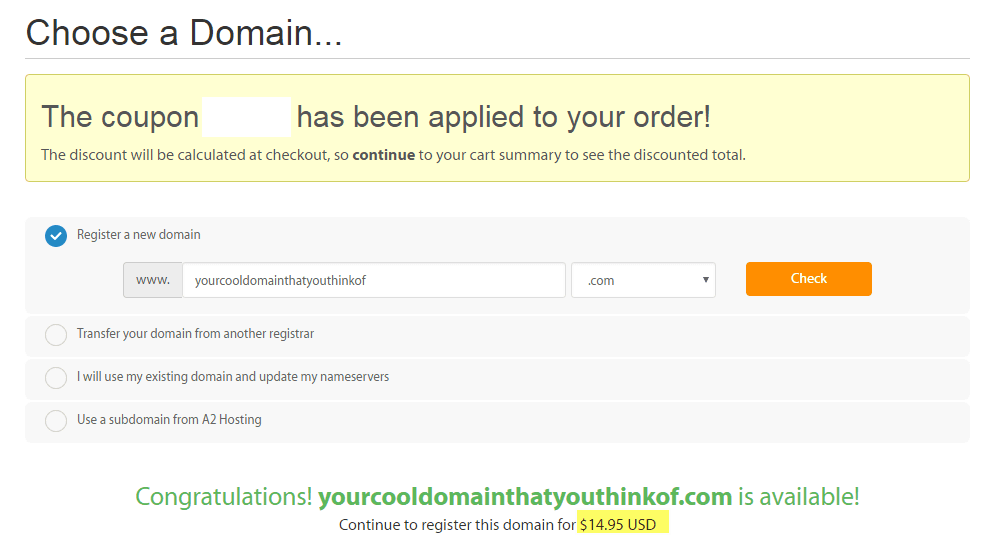
Step 3: Find Your Domain Name (Optional)
In this step I used an example but, once you have found a domain name you like that is available, you will want to click the green continue button. I highlighted the domain registration cost. This is the cost on the day this article was created and may vary. Keep an eye out for it though so you know what it is. I am trying to be thorough so you don’t have any surprises!


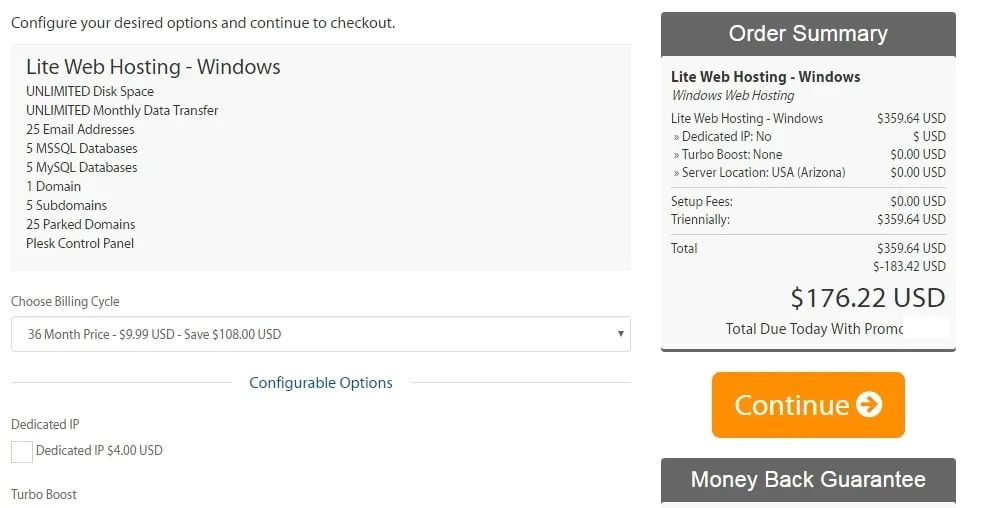
Step 4: Select Billing Cycle
I don’t want you to get panicked when you get to this page and see your total. Don’t WORRY, we’ll fix it. Here is the starting total when I pressed continue from the step above:

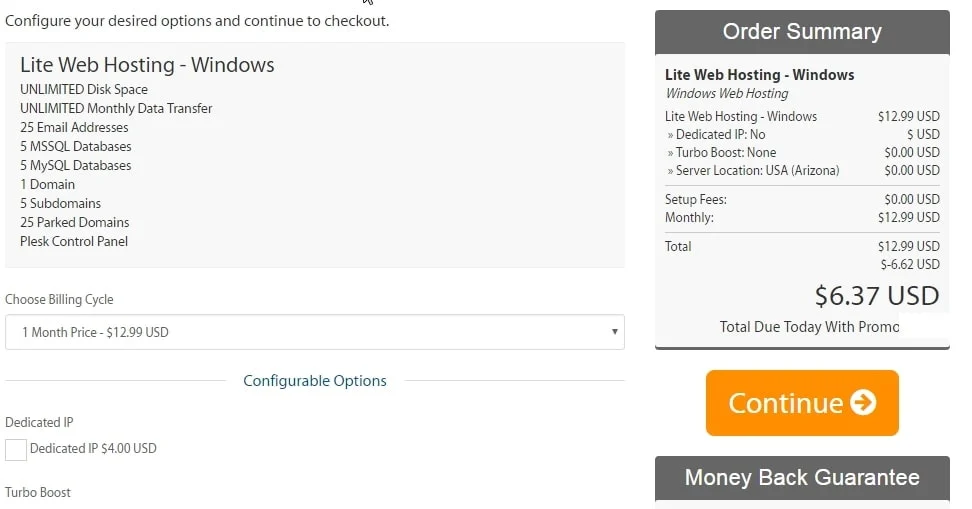
From here you want to select the drop down under Choose Billing Cycle and select 1 month. Again, the pricing will vary here depending on the current special they have going, the season, etc. This dropped my total due today down to $6.37 with the discount my affiliate link was offering on this day. The recurring charge to my credit card will be $12.99 each month for the hosting.

Step 5: Add-on or Decline Options
Depending on what best fits your needs you will want to add on or decline options.
Domain Name Privacy
This option only applies if you registered the domain here using step 3.
The biggest question here is how you want to handle privacy. Anybody who registers a domain has to provide contact details for that domain. It can either be your real name and home address, real name and PO Box, OR you can choose domain privacy. If you have a PO Box and are OK with people knowing your name…you don’t need Domain Privacy. If you don’t want people knowing your name or if you don’t have a PO Box and are worried about privacy, select the ID Protection. It is an annual fee. By choosing domain privacy, generic information will be loaded for people looking to find out who owns the domain. You still can put whatever you want in your blog, including your full address if you want to, but the domain name lookup services will see generic information.
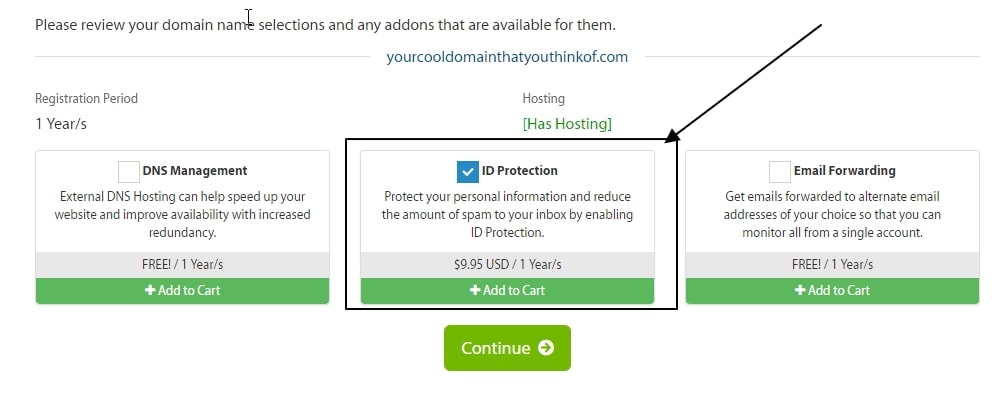
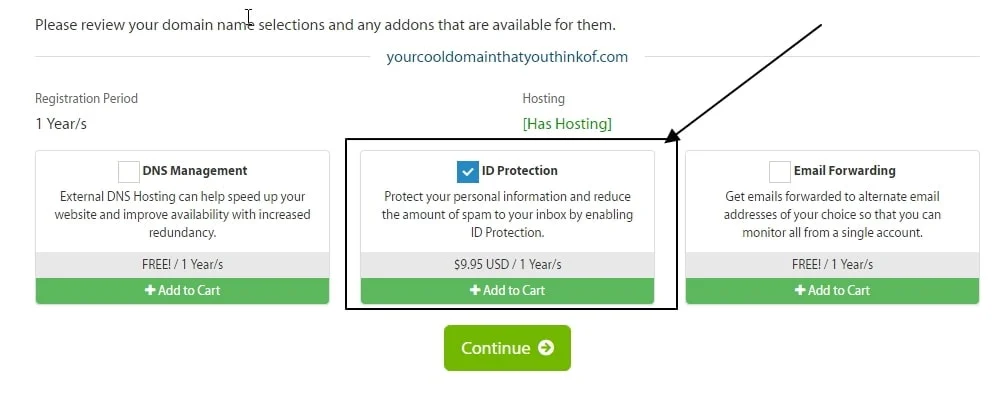
In this case since DNS Management and Email Forwarding are free you could add those too. I left ID protection and clicked the green continue button.
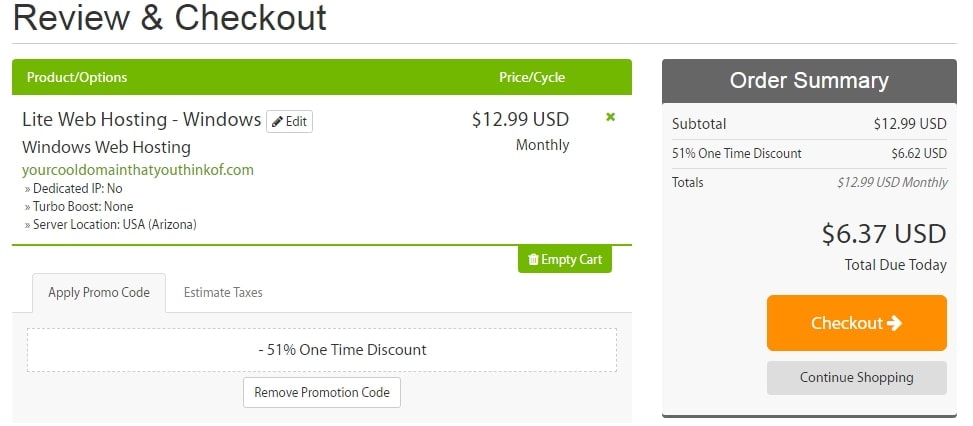
Step 6: Review Options and Checkout
This is the final step. You’ll want to review your cart and make sure it looks correct. In this case my affiliate link results in a 51% discount off the hosting. We can see that the $14.95 domain registration and the $9.95 privacy show up on one line as a total of $24.90. The total due in this example is just $31.27!
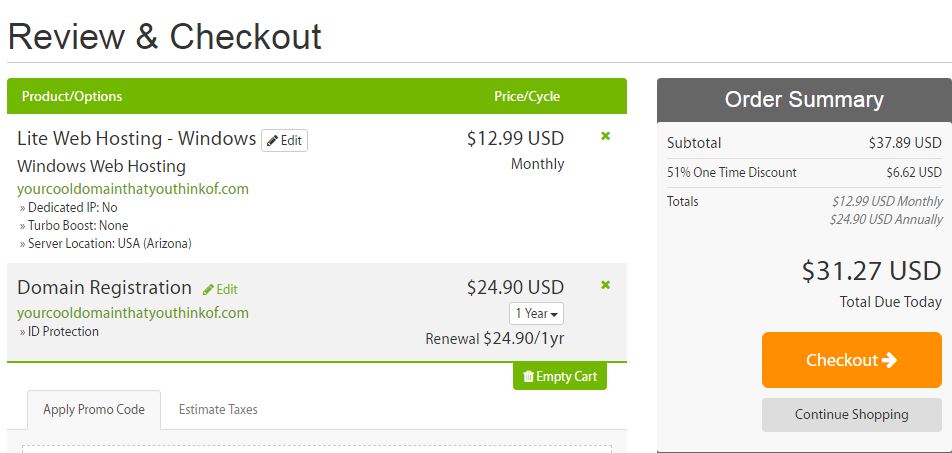

I clicked the X button on Domain Registration to remove it and the privacy for those of you that may already have your domains or don’t have a domain name idea yet. If I didn’t add the domain and domain privacy my total was only $6.37.

All you need to do is check out and you are done!


RELATED POST